Grass Gotta Go!

23 Jun

View from the pool...thirsty grass gotta go.

I learned of the Santa Clara Valley Water District Landscape Rebate Program last year and looked into the rules and requirements, but I didn’t proceed. Mainly because it seemed such a daunting task, given my limited knowledge of drought tolerant plants.

This year, when they extended the program, I visited a neighbor’s garden that had been converted from almost 9,000 square feet of lawn to California native plants. It looked nice enough, and when she showed me a copy of the check she received for $17,000 I became a believer. Money talks.

I did some more research, attended a public forum on the program and soon realized that not only would this incentive pay for the conversion, but there was clearly enough money built into the rebate that I could afford an expert to design the gardens. Limited knowledge problem solved.

Enter Deborah Cottingham, landscape designer, specializing in Native California and drought tolerant plants. Debbie has designed several “rebate ready” gardens and fully understands the program requirements. I visited her 2+ acre property a few weeks ago to get a first hand look at a mature native garden. It was dizzying!

A Hummingbird on Salvia clevelandii, Alpine Cleveland sage or Musk Sage from Las Pilitas Nursery

A Hummingbird on Salvia clevelandii, Alpine Cleveland sage or Musk Sage from Las Pilitas Nursery.

And so we have begun. Debbie has walked, measured and photographed two of my big lawns, and designed a beautiful, interesting, low maintenance, Water-wise Garden that will attract birds, butterflies and bees. I have begun to stockpile wood chips and hoard cardboard for sheet mulching (another blog), and I am familiarizing myself with all the plants she has chosen. Tomorrow I will submit my application to the Santa Clara Valley Water District, along with the landscape design, plant list and photos of the existing lawns. And wait. Until they approve. Until I get my Notice to Proceed. Or not. I am going to turn off the sprinklers and start digging tomorrow.

Hasta pronto!

Back to Blogging…New Topic

18 Jun

Oh  man! I have not posted a blog in 2 or more years.

When I was still WORKING…I used to break up my day by writing little stories and posting pictures about my LIFE. That included gardening, cooking, canning, preserving and travel in the motorhome. Now that I’ve retired, my LIFE has become taking care of the monster we’ve created with orchard, vegetable garden and chicken ranch.

These days it seems I mostly communicate via messaging, Facebook, and Instagram, and I rarely retreat to the back of the house where the big monitor and computer reside.

Tomorrow we are getting up at dark am to drive to the coast to get some laying hens. I’m also in the middle of converting 2 more lawns to native/drought resistant landscapes. I think I will share a bit of this. We are experiencing a severe drought here in California, and local water districts are offering some incentives to change. Even if they didn’t, I am learning a lot about a genre of plants that are much more interesting than green grass lawns.

Trying to recall how to add images and links to a blog. Let me know if you give a shit.

Lemon Dainty

30 Jan

souffle

It’s the height of Meyer Lemon season and I am fortunate that my friend Susan has a huge tree and is so generous with the fruit. She also gave me this recipe that she found in an old Junior League cookbook…remember when we used cookbooks rather than google search?

The editor of the cookbook described the recipe as such:

This was found, neatly penned, on a tattered page of an old family recipe book. The date was 1931, the description “…a delicate crust will form on top of the pudding…supplies its own sauce. Very fine.”

It is indeed a very fine pudding cake. It is also pretty, easy to make, light and tangy, and it can be made gluten free!

Here’s the recipe and a couple of notes.

1 cup sugar
¼ cup flour (any GF flour will do)
¼ teaspoon salt
2 tablespoons butter, melted
5 to 6 tablespoons lemon juice
Grated rind of 2 small lemons
3 egg yolks
1 ½ cups milk
3 egg whites, beaten stiff

Preheat oven to 350 degrees.

Combine dry ingredients in a large mixing bowl. Add melted butter, lemon juice and rind. Blend with a whisk. Add yolks and milk and beat with whisk until well-blended.

Beat whites until stiff but not dry. Fold into lemon mixture. Pour into a buttered 1 ½ quart soufflé dish. Set dish in a shallow roasting pan filled with 1 inch of hot water. Bake one hour.


folding

This is a pretty dessert that anyone can make…even if you’ve never folded egg whites into a batter before. If you find that idea daunting, here’s a quick how-to video.

Folding Egg Whites 

Cake on the top and custard on the bottom...truly dainty!

Cake on the top and custard on the bottom…truly dainty!

This dessert an be served warm or cold in shallow bowls. Lovely with fresh berries!

Mexican Comfort Food

14 Jan

plated

My son-in-law, Jeremy,  arguably makes the best Chicken Tortilla Soup north of the border, so I’ve taken a few pages from his cookbook to create this hearty, flavorful dish. One of his secrets is the roasted corn. You can buy this at Trader Joe’s if you’re lucky enough to have one in your neighborhood; but you can also roast two ears of fresh corn on the grill and then cut the kernels off.

Tortilla Soup is one of my favorite “foodie movies”. It brilliantly displays the art of Mexican cuisine and how food can bring people together. One of the best scenes in the film is over a family dinner of  Tortilla Soup, where Paul Rodriguez, as the suitor of one daughter, nervously prates on about the “toppings” that are part of the dish, and how much he enjoys them. “I love toppings. Sometimes I go to restaurants and just order toppings”.

Whenever our family eats this dish together someone always makes a reference to this part of the movie, and Jeremy even manages a bit of a Mexican accent when he says it! So here’s my slow cooker version of a soup that comforts me and connects me to my Big Fat Mexican Family!

1 lb chicken breast, trimmed
½ bag of Trader Joe’s roasted sweet corn or 1 can sweet corn
15 oz can diced tomatoes, drained
5 cups chicken stock
1 medium onion, chopped
3 jalapano peppers, seeded and chopped
2 cloves garlic, diced
1 tsp chili powder
1 tsp ground cumin
Salt & pepper to taste

Place all ingredients in slow cooker and cook for 8 hours on low or 4 hours on high. Shred chicken and return to slow cooker.

tortillastrips

If possible, the day before you make the soup you can cut tortillas in strips and let them dry out on a baking sheet. An hour before serving place the baking sheet in a 250 degree oven and let them slowly roast. Keep an eye on them and when they are golden remove from oven.

tostaditas

TOPPINGS

Tortilla Strips
Shredded white cabbage
Shredded cheese
Avocado, cubed
Green onions, chopped
Cilantro, chopped
Limes

toppings

Buen provecho, amigos! Enjoy!

Pollo Pibil!

14 Jan

PolloPibil Eddie and I had a grand time celebrating the New Year with our family in Veracruz and, as you might imagine, enjoyed some incredible meals. New Year’s Eve dinner was for 40, and one of the starring dishes was Pollo Pibil, a regional recipe from the south of Mexico. bananaleaves

The three principal flavoring ingredients in this recipe are achiote, a paste made from annatto seeds, Acuyo leaf, also known as Hoja Santa or Yerba Santa, and banana leaves. Banana leaves are used to steam meats and tamales in Veracruz, the YucatanPeninsula and other southern states, and add a delightful fragrance and taste to the filling.

achiotebanana

The week prior to our visit my niece had been vacationing in Merida, Yucatan, and she brought home some achiote paste. She kindly gave me a bag of it,  and my godson’s grandmother also gave me a small bag of Acuyo leaves from her garden. I “smuggled” all this across the border and promptly went shopping for banana leaves at our local Mexican market. If you can find a store that sells banana leaves they will also carry achiote paste, and perhaps even Acuyo leaves. If you can’t find the Acuyo you might add a few sprigs of mint to the top of the dish before baking.

INGREDIENTS
3 to 4 pound chicken, in pieces. Cut breast in 4 pieces
1 onion
Banana leaf
4 Acuyo leaves (hoja santa or yerba santa)

MARINADE
1/3 cup achiote paste
Juice from one orange
Juice from 3 Meyer lemons
1 clove garlic
1 tsp. ground cumin
1 Tbsp. salt
1 tsp. ground pepper

Mix marinade ingredients in blender at high speed. Taste and add salt as needed. Place chicken pieces in ZipLock bag and add marinade. Seal bag and massage until chicken pieces are well coated. Refrigerate for 24 hours, occasionally massaging and turning to ensure chicken is well coated.

marinade

On day 2, cut banana leaves in sheets large enough to create 2 folding layers that will create a “boat” in a roasting dish. Quickly roast the sheets over a flame, moving across, until the outer part of the leaf becomes shiny. With a damp cloth, wipe both sides of the leaves and place them horizontally and vertically in the roasting pan.

leafboat

Add marinated chicken pieces

chicken

Slice one onion in rounds and cover the chicken with rings.

chickonion

Place fresh Acuyo leaves over onion.

acuyo

Tightly close the banana leaves to seal the dish.

wrapped

Cover roasting pan with aluminum foil and bake at 375 degrees for 1 hour.

foiled

Serve with Mexican Rice, black bean soup and warm corn tortillas. Buen provecho!

finished

Comfort Food ala Francaise

8 Dec

plated

I think meatloaf is the epitome of comfort food, and it is also fairly easy to “change it up” a bit. Yesterday I decided to put a French twist on it, using a sautéed mire poix (chopped onion, celery and carrots), Herbs de Provence (a blend of oregano, thyme, savory, lavender, basil, sage, and rosemary) and a spicy sweet glaze of catsup, Dijon mustard, brown sugar and Cabernet.

Meatloaf

1 medium onion, diced
½ cup chopped celery
½ cup diced carrots
2 Tbsp. olive oil
1 pound lean ground beef
½ pound ground pork
2 Tbsp. Herbs de Provence
1 tsp. garlic salt
1 tsp. ground pepper
2 eggs, beaten
1 cup gluten free Panko-style bread crumbs

mirepoix

In large skillet, lightly sauté the mire poix until onions are translucent. Remove from heat and let cool while preparing the rest of the mixture.

The key to a good meatloaf, or meatball for that matter, is not to over work the mix. Let meat stand outside refrigerator for about ½ an hour to bring up to room temperature.

mixture

Add mire poix and other ingredients to meat and use your hands to mix everything just until it all holds together. Place in loaf pan.

Glaze

1/2 cup catsup
3 Tbsp. Dijon mustard
1 Tbsp. brown sugar
¼ cup Cabernet

glaze

Mix well and spread glaze evenly over meatloaf. Cover with aluminum foil and bake at 375° for 45 minutes. Remove foil and set oven to broil. Keep an eye on the loaf and remove when glaze has started to caramelize.

Ooh-la-la! C’était parfait!

meatloaf

Nanaimo Bar Time!

3 Dec

https://ruminski.files.wordpress.com/2012/12/nanaimobar21.jpg

My friend Denise introduced me to these scrumptious no-bake, three layer cookie bars many years ago. My kids loved them and I’ve made them every year hence at Christmas. They start with a graham cracker crumb, cocoa, coconut, and chopped nut base, followed by a layer of custardy butter cream, and are then topped with a shimmering layer of semi-sweet chocolate.

Nanaimo Bars are one of Canada’s favorite confections, named after the city of Nanaimo, British Columbia. It all began when Mabel Jenkins, a Nanaimo housewife entered the recipe in a magazine contest in the 1950’s. She won the contest with these tasty treats and made her hometown famous for them.

This year, after being diagnosed with Celiac Disease, I needed to adapt the recipe to be gluten-free (GF). No problem! In fact, this development made me even more creative in the kitchen. For the first batch I used GF graham crackers and really didn’t change the recipe. But while I was shopping at People and Planet yesterday I picked up some GF chocolate crisp cookies, which the shop owner told me his GF clients love for making alternative chocolate cookie-based pie crusts.

Since the crumb crust was already going to be mighty chocolatey, I decided to add instant espresso to the first layer for a mocha twist. I also thought about my granddaughter, Lila Blue, and our shared love of French sea salt with chocolate. So, here’s the recipe for my latest version of Nanaimo Bars.

https://ruminski.files.wordpress.com/2012/12/layer1.jpg

FIRST LAYER
1/2 cup unsalted butter
1/4 cup sugar
2 TBSP dark cocoa powder. (For the original recipe use 5 TBSP cocoa and omit the instant espresso)
3 TBSP instant espresso
1 egg, beaten
1 3/4 cups GF chocolate crisp crumbs (place in large zip lock bag and crush with rolling pin). For the original recipe use graham cracker crumbs
1 cup shredded or flaked coconut; sweetened
1/2 cup dry roasted almonds; finely chopped. You can also use chopped walnuts or pecans.

Place butter, sugar, instant espresso and cocoa powder in double boiler over barely simmering water. Stir occasionally until melted. Slowly add beaten egg and stir to cook and thicken. Remove from heat and add to crumbs, coconut and chopped almonds.  Press firmly into ungreased 8″ square pan. Chill for 1 hour.

https://ruminski.files.wordpress.com/2012/12/layer2.jpg

SECOND LAYER
1/2 cup unsalted butter at room temperature
3 TBSP heavy whipping ream
2 TBSP vanilla instant pudding or Bird’s custard powder
2 cups powdered sugar

Cream together butter, cream and custard powder in mixing bowl, and gradually beat in powdered sugar until light and fluffy. Spread over first layer. Chill for 1 hour.
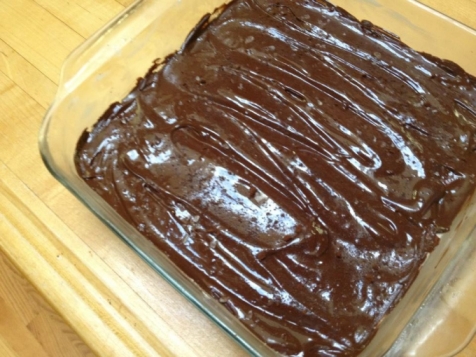
https://ruminski.files.wordpress.com/2012/12/layer3.jpg

ICING
4 oz bakers chocolate; semisweet (4 sq)
2 TBSP unsalted butter
Sprinkles of coarse sea salt

Melt chocolate and butter in top of double boiler over barely simmering water. Stir to combine. Cool to room temperature and spread evenly over second layer with spatula. Sprinkle with coarse sea salt.

Store in fridge until chocolate topping begins to harden. Score topping into 16 small bars (bites). Cut before totally solid, use a hot knife, wiping clean between cuts. Store in fridge or freeze for up to 2 months.

This recipe is quite adaptable. If you love peanut butter you can use that in the buttercream, or mint chocolate lovers can add a few drops of peppermint extract to the filling. Here are a few options I found and intend to experiment with. You may have to adjust the powdered sugar to reach the right consistency when using liqueur.

mint_cherry

PEANUT BUTTER FILLING– 2 TBSP softened unsalted butter, 3 TBSP whipping cream, 2 Tbsp custard powder or vanilla instant pudding, 1/2 cup smooth peanut butter at room temperature,  2 cups powdered sugar.

MINT FILLING — 1/2 cup butter, 3 TBSP whipping cream, 2 Tbsp custard powder or instant vanilla pudding, 2 cups powdered sugar, 1/2 teaspoon peppermint flavoring, 1-2 drops green food coloring as desired.

GRAND MARNIER FILLING — 1/3 cup softened unsalted butter, 3 TBSP custard powder or vanilla instant pudding, 1/4 cup Grand Marnier or orange liqueur, 1 TBSP orange rind, coarsely grated, 2-3 cups powdered sugar.

BAILEY’S IRISH CREAM FILLING — 1/3 cup softened unsalted butter, 3 TBSP custard powder or vanilla instant pudding, 1/4 cup Bailey’s Irish Cream, 2-3 cups powdered sugar.

CHERRY FILLING — 1/4 cup butter; softened, 3 TBSP custard powerder or vanilla instant pudding, 1 tablespoon Maraschino cherry juice, 2 cups powdered sugar, 1/3 cup chopped Maraschino cherries, 1-2 drops of red food coloring.

Chiles Rellenos ala Consuelo

18 Nov

From daybreak until late afternoon, my mother-in-law’s kitchen in Mexico City was a steaming miasma of spice and sweetness. Although she didn’t do a lot of the actual cooking, she supervised the elaborate meals and taught her cooks exactly how everything should look, taste and smell. She also taught me the basics of Mexican cuisine, and every time we visited she would make one or more of our favorite dishes while I stood by or helped with preparation.

Consuelo liked to get to market early to chose the freshest ingredients and often a bouquet of flowers.  Here she is in the San Juan market in Mexico City, 1987. Great times!

Chiles Rellenos is still one of my favorite Mexican dishes, and after years of making it, my recipe definitely has Consuelo’s “sazon”. The secret to really great Mexican food is time…letting things simmer, reduce and meld. One of the foundations of “comida casera” is a rich tomato paste that is used in sauces, soups, Spanish rice and other dishes.

SALSA DE JITOMATE
1 pound ripe tomatoes, preferably Roma type
1 small onion
3 cloves garlic
½ cup water
4 Tbsp. canola oil

Place tomatoes, onion, garlic and water in food processor and mill gently. Heat oil to high but not smoking. Strain the vegetable puree through a food mill or sieve, to remove seeds and skins, directly into hot oil. Cook on medium heat until mixture is reduced by half. Lower heat to simmer and reduce until the oil is the only liquid in the pan. At this stage the paste should be watched closely. Add oil, if needed, to prevent scorching

Note: I triple or quadruple this recipe when tomatoes are abundant and freeze small containers of the tomato paste.

It may seem silly, but now we are going to add liquid BACK to the paste to create a soupy sauce for the Chiles Rellenos. In a large covered skillet, sauté 1 onion, sliced in thin half moons and 1 or 2 jalapeno chiles, seeded and sliced, until slightly softened. Add tomato paste and stir to coat vegetables. Add 4 cups chicken broth and simmer for half an hour.

Fire roast chiles over gas range, gas grill or under broiler until blackened. As they finish, place them in a covered dish to sweat.

CHILES RELLENOS
4 large poblano chiles
4 eggs at room temperature
1/2 cup flour
1 cup Cotija cheese
1/2 pound Oaxaca cheese (you can also use String Cheese or Mozarella)
1 cup canola oil
1 bunch cilantro, chopped

When roasting is finished, start with first chile off the grill and, under cold water, slip the skins, trying to leave the pepper intact. Next, make a slit down one side of the chile and carefully reach in and remove the seeds and veins. This is easier to do under running water. Pat dry and stuff each chile with cheese. Be careful not to overstuff as they will leak. I like to leave a little overlap. Close and fasten with toothpicks and set aside.

To make the batter, start by separating eggs and lightly beating egg yolks. In stand mixer, whip egg whites on high speed to soft peaks. Gently fold in egg yolks.

In small bowl dust chiles with flour, then dip in egg batter and place in medium hot oil. (I usually do two chiles at a time, as they must be watched to prevent burning.) Turn chiles once so they are golden on both sides and then place them in the sauce and cover.

Cover and simmer chiles in sauce for 30 minutes, add cilantro and mix in. Remove from heat and let rest for 10 minutes. Serve with rice, beans and tortillas.

A dusting of grated Cotija cheese on the beans and lime juice on the rice is traditional.

Since I had harvested the last of my poblanos from the vegetable garden I roasted them all. I used the remainder of them to make pickled pepper and onion…another traditional side dish. Remove the chile tops, tear into strips and slice white onion in thin rounds. Add ½ cup cider vinegar and salt to vegetables. Mix well and refrigerate for at least an hour before serving.

We will be visiting Consuelo in Veracruz in January and I am really looking forward to getting a tune-up on my sauce and chile relleno recipes. Gracias, Suegrita!

Yazmin and her great grandmother Consuelo in Veracruz two years ago.

A British Tradition: The Sunday Roast

16 Nov

Boneless leg of lamb roasted on the Weber…YUM!

The roots of my mother’s family are in Great Britain, where leg of lamb is the traditional joint for a Sunday roast; yet she didn’t like it and never served it. Most folks either love or hate lamb…not too many “in-betweenies” on the fare. In spite of the fact that we didn’t eat it growing up, I have come to be one of the lamb lovers and am particularly happy with the fact that it is a pasture-raised animal.

We saw some New Zealand lamb at Costco last week and Eddie offered to roast a leg on the Weber. The roast was nearly 5 pounds, so we cut off 2 pounds and froze that to grind later for meatballs.

The boneless leg came neatly packaged in a string “sock”, which Eddie removed to trim the meat and stuff with about 6 cloves of chopped garlic, rubbing it in well with a little salt and pepper.

Then he swathed the roast in fresh rosemary stalks and we squeezed the whole thing back into the sock…a 2-person project. He started the charcoal in the Weber about ½ an hour before putting the joint on the rack and then roasted it for an hour and a half.

Alternately, you can use butcher string to bind up the leg before roasting.

It came out looking beautiful and after a 20 minute rest, he cut off a few thick slices of medium rare, tender and savory lamb, which I served with a brown rice pilaf and steamed brussel sprouts. I also served Gingery Wine Grape Jelly instead of the traditional Mint Jelly…an interesting twist.

Now, an entire roast is a lot of meat for two people and we are not averse to leftovers for a few days in a row, so on Day Two I made a gluten-free brown gravy and we had that with slices of lamb, leftover pilaf and steamed green beans.

On Day Three I added carrots, mushrooms, celery, chopped onion, the leftover green beans and brussel sprouts to the gravy, trimmed and diced the remaining lamb and made a Shepherd’s Pie. Actually, I had so much filling that I put half of it in the freezer, and the other half in a casserole topped with mashed potatoes and baked it for 45 minutes until the potatoes turned golden brown. And, yes, on Day Four we had leftover Shepherd’s Pie for dinner.

Cover the casserole with mashed potatoes and bake until they turn golden brown.

We truly enjoyed this traditional roast all week long, but I think we might be ready for something different this weekend!

Fruit of the Vine

31 Oct

Petite Sirah grapes have a high skin to juice ratio, producing wines with high tannins and acidity, giving them the ability to age well.

Three years ago we watched our neighbors plant 500 Petite Sirah grapevines, and then cut and discard the green grapes for 2 years in order to train the plants. This year was their first harvest and after the picking crew had taken the bulk of the grapes they asked us if we’d like to glean the vineyard for chicken treats.

We arrived with buckets and baskets and started to pick…and taste! Chickens Schmickens! There is some excellent juice in those berries, I thought. I looked for recipes online and found one for Gingery Wine Grape Jelly. My first batch didn’t gel, though it is a fine syrup, so I canned it like that. I have always made jams and preserves the French way, by cooking them down, but had never used pectin or made jelly, for that matter.

For the first batch, which became syrup, I used this list of ingredients.

7-1/2 cups wine grape juice
2/3 cup lemon juice
½ cup chopped fresh ginger
1 box SURE-JELL Fruit Pectin
7 cups sugar, measured into separate bowl

I started with approximately 10 pounds of grapes and got almost 8 cups of juice. The first step is to wash and stem the grapes. In small batches, in a fairly deep container, crush fruit with a potato masher. The deep dish is important, as the grapes pop and squirt quite vigorously when they are crushed.

Place grapes in a deep cookpot and bring to a boil over medium heat. Reduce heat and simmer 10 minutes.

 Let cool and then strain juice through a fine sieve to remove skin and seeds.

I used a sturdy water glass to press the juice out. The result is a rather pulpy juice.

Place 6 ½ cups grape juice in a deep stainless steel cookpot, reserving 1 cup. An extra large pot is best because when jelly starts boiling it wants to go up, up and away over the edge of the pot…at least mine did, leaving me a sticky purple stovetop.

Peel and chop fresh ginger. Place ginger, lemon juice and 1 cup of grape juice in blender to pulverize ginger. Strain this mixture through a fine sieve into grape juice. Stir in 1 package Sure Jell and bring to a full rolling boil over high heat, stirring constantly. Reduce heat and simmer while you measure sugar into a separate bowl.

A full rolling boil is a boil that can’t be “stirred down” over high heat.

Stir in sugar, return to a full rolling boil and cook for exactly 1 minute, stirring constantly. Remove from heat and ladle into hot sterilized jars, filling to within 1/8 inch of tops. Wipe jar rims and threads. Cover with two-piece lids. Screw bands tightly. Place jars on elevated rack in canner. Lower rack into canner. (Water must cover jars by 1 to 2 inches. Add boiling water, if necessary.) Cover; bring water to gentle boil. Process 5 min. Remove jars and place upright on a towel to cool completely. After jars cool, check seals by pressing middles of lids with finger. (If lids spring back, lids are not sealed and refrigeration is necessary.)

Gingery Wine Grape Syrup and Jelly

I had an abundance of grapes, so I tried it again after consulting the Sure Jell site, and the Joy of Cooking and Betty Crocker cookbooks. This time, to be sure it would gel, I reduced the amount of grape juice to 5 cups, lemon juice to ½ cup, used a little less ginger, and then cooked it at a higher heat for 2 minutes. This batch was perfect on pancakes!

Pamela’s Gluten Free Pancake Mix…highly recommend!

Today I was almost out of grape juice, but I had some pomegranates, so I decided to try that combo without ginger or lemon juice so that the pomegranate could shine. For this batch I used the following ingredients and cooked it the same way.

1-1/2 cups pomegranate juice
2 cups wine grape juice
1 box SURE-JELL Fruit Pectin
5 cups sugar, measured into separate bowl

Bottom Line: Wine grapes have a great deal more complexity than the Concord grapes typically used for Grape Jelly; and if you like ginger or pomegranate, both flavors pair spectacularly well with them.

Why Didn’t I Think of That?

9 Oct

Last week my friend at City Girl Farming blogged about making Green Tomato Sauce and I thought to myself “Why didn’t I think of that?” I make salsa verde ALL the time, but I use tomatillos, not tomatoes! Well, from the pictures she posted I figured why not substitute green tomatoes?

I used the gas grill to fire roast the green tomatoes and a bunch of green and red jalapenos. The red ones are hotter than the green ones, mind you. After everything was charred I let them sit for 15 minute to cool, trimmed the stems and cores, washed the peeling off the tomatoes and cut them in chunks.

All this went into the VitaMix with a small chopped onion and 6 cloves of garlic. Once everything was pureed I simmered it for 10 minutes and added some salt and cilantro.

I got two good sized containers of spicy and delicious salsa from this small batch and made green enchiladas with one of them. The second one is in the freezer. Now that I know this works I plan to use all the unripened tomatoes for a big batch later this month, and I think I’ll can it, rather than freeze it. No tomato will ever be wasted again, thanks to City Girl Farming!

Calabasitas

8 Oct

The Mexican “sofrito” takes off on the French mirepoix (onions, carrots and celery) with onions, tomatoes and chiles. It is the basis of  this recipe my sister-in-law Dina taught me years ago at her home in Veracruz.

With the end of tomato season almost here and the last of my summer squash just harvested, I felt compelled to make this south-of-the-border dish one more time this year. It is a go-to vegetable dish in our house during the summer and also keeps well in the freezer. Though I don’t normally use a recipe, I tried to measure everything this time in order to share it with you.

  • 2 Tablespoons olive oil
  • 1 white onion – diced
  • 3 cloves garlic – minced
  • 4 jalapenos – seeded or not, depending on your heat tolerance
  • 1 cup diced ripe tomatoes
  • 1 Tablespoon Knorr Suiza chicken bouillon
  • 1 cup frozen corn kernels – roasted, if you can find them
  • 4 cups diced summer squash (calabasita)
  • ½ cup chopped cilantro
  • Salt to taste

Sauté onions until soft, add garlic and sauté another minute. Add chopped chiles. As for the chiles, we like lip-sizzling spicy, so I leave the seeds in the jalapenos, but you can remove them to tone it down. If you can’t stand spicy at all you can use bell peppers or mild Anaheim chiles. This “sofrito” should be simmered until chiles begin to change color.

Add tomatoes and the chicken bouillon and sauté until tomatoes release their juices, about 1 minute. Add frozen corn. Cover and simmer for 2 or 3 minutes.

If you have very young summer squash you can just dice them, but my end of season squash were pretty big, so I scooped out the seedy interior, leaving just the firm outer flesh and rind.

Add squash to sauté pan and mix thoroughly with other ingredients. Cover and simmer for 5 to 10 minutes, depending on level of squash crunchiness you prefer. The last step is to add cilantro, mix thoroughly over high heat and then cover pan and remove from heat. Let rest for about 10 minutes and salt to taste.

This is a great side dish and very versatile. I recently used it as a filling for vegetarian enchiladas and they were a huge hit. I’ve also frozen it and added to soups during the winter. I hope you enjoy it as much as we do.

Saving Heirloom Seeds

26 Sep

At our Harvest Party and Tomato Tasting last weekend we sampled dozens of different heirloom tomatoes from our plants and from those of some of my fellow Garden Club members. The variety of shapes, sizes, colors and flavors was dazzling!

Because heirloom tomatoes, unlike hybrids, can reproduce themselves it is fun and easy to save and plant the seeds of your favorites.To save seeds you can simply “squish” them into a paper napkin, write down the name of it right there, take it home to dry and then plant the seeds next spring. However, to improve seed viability and germination, I asked our guest Sue, who is the chairman of our Tomato Plant Committee and heirloom expert, about the best way to save seeds.

One of the tastiest and most interesting looking specimens I sampled was the Tlacolula Pink, an heirloom from Oaxaca, Mexico. Sue grew this variety a few years ago and passed seeds on to Elaine. Elaine’s didn’t do well their first year, but this year they volunteered in her garden and she got a great crop. So I decided I’d try growing the the third “generation” of them.

Per Sue’s instruction, the first step is to cut the tomato in half crosswise. Then push a finger into the cavities and pull out the gel and seeds in the center of the fruit.

Put the seeds and gel in a small dish and add a few ounces of water, and let sit for 2 or 3 days until a scummy layer forms on top.

The next step is to rinse the seeds  in a fine sieve to remove the gel and scum and place the seeds in a coffee filter to dry.

The coffee filter is practical because the seeds won’t stick to it.

When the seeds are fully dried place them in an envelope, label and store in a cool, dry place until you are ready to plant your seedlings.

I’m looking forward to eating these tomatoes next year. Their distinctive shape will be a nice addition to salads and they also look like a good candidate for marinara and tomato paste. Most off all, it makes me feel good to know that I am helping preserve a sustainable heirloom plant.

Not Your Grandpa’s Chicken Feeder

4 Aug

“That’s not worth chicken feed!” is an expression that alludes to a trifling amount of money. The phrase came into usage in the 1800s when cracked corn and other grains too small for other livestock were considered a cheap feed for the family flock. Not these days, though…especially if you are buying organic feed.

Our hens are endlessly entertaining and provide us with gorgeous, healthful eggs, but they’re chickens and they are determined and purposeful when they eat…seeking out their favorite morsels and tossing the layer crumble willy-nilly out of their feeders.

We tried a number of commercial and Do-It-Yourself feeders, in different configurations, at different heights, and in different locations. My husband Eddie (a mechanical engineer who borders on OCD regarding wastefulness) was determined to design something that would reduce what he estimates to be 25% of feed wasted with typical feeders.

The result is The Ultimate Fowl Feeder. The key to reducing waste is to minimize “billing out”. Because the feeder openings are just large enough for the hens to get their beaks in – but not bill out the feed – waste is virtually eliminated.

Another advantage of this design is less frequent refilling. The feeder holds 25 pounds of layer crumble – enough to feed 12 hens for approximately one week. And, because it is gravity-fed, the crumble slides down and is smoothly dispensed until empty.

In response to feedback from some of our early customers, Eddie has now developed some accessories for the feeder, including a solid cover to foil night-feeding rodents, a wall-mount bracket and a set of hanging hooks.

Our flock of 40 laying hens earn their salt (or their feed) by producing about two dozen eggs a day, which we sell to friends and neighbors. With The Ultimate Fowl Feeder we have now made the endeavor a bit more profitable, much less wasteful and quite a bit tidier.

Edible Landscaping

24 Jul

Edible landscaping is becoming a popular alternative to the typical ornamental landscape, because many trees, shrubs and herbaceous plants with edible parts can serve the same function as ornamentals, and look just as good. For years I’ve planted herbs such as parsley, chives, basil and lemon thyme along the front of the flower beds, if only to have quick access to them from the kitchen.

This year a friend gave me a huge box of Walla Walla onion sets. I shared them with some members of my garden club, but still I had a mountain of sets that I couldn’t find room for in the veggie garden.  My only option was to plant them in the flower beds. A number of them went into a very sunny area where I usually plant a mixed bunch of sunflowers and the others went willy-nilly into the flower beds. The young foliage blended nicely with the ornamentals and perhaps even helped repel some pests.

Since these particular onions get to be quite large, overwhelming some of the bedding plants, I gradually pulled the young ones out over spring and early summer and we enjoyed them in stir fry, salads and on the grill, leaving only those in front of the sunflowers to mature.

Yesterday I harvested the last of the crop…nearly 25 pounds…as the tops were dying back and the skins had begun to dry.  Eddie is planning to make several batches of his fabulous French Onion Soup this week, which we will freeze to enjoy next winter.

Now I’m thinking about what other edibles I can incorporate into the flower beds next year. Rhubarb would be pretty, wouldn’t it?

Truth in Labeling

10 Jul

Deciphering an egg carton label can be a perplexing experience. Natural. Organic. Free Range. Cage Free. How do we know what these terms mean, since there is really no official standard for egg production…and no method for enforcing one if it existed.

I am fortunate in that we now have our own flock of laying hens and I no longer have to ponder the vagaries of egg labeling, but this blog by Francis Lam will give you a better idea of what you are choosing from the egg aisle.

Our hens free range on 2 acres of pasture.

Our hens are pastured and very productive.  We sell most of our surplus eggs to friends and neighbors, but this summer when many of our regulars went on vacation and our hens starting laying 2 dozen eggs a day, we were suddenly overstocked. There’s a corner near our house where folks sell random furniture, produce, crafts, etc., and one Saturday Eddie suggested we go sell some eggs there.

We sold out in an hour or so, but one gentleman objected to our $5 a dozen price and told us he could get farm fresh eggs up the road for $3 a dozen. Really? Well, after we packed up the vehicle we went on down the road to check out the competition.

As we drove up to the farmhouse we saw the sign “Farm Fresh Eggs $3”. We could see a dozen or so hens scratching around in the pasture with the cows, but we knew that couldn’t be their entire flock! As I got out of the car a woman in tall rubber boots exited a huge barn next to the farmhouse and I told her I’d like to buy a dozen eggs. She went into the house and came out with a carton of brown eggs.

I asked her how many hens she had and she said 500 and dismissed me. Then I knew…those hens were in the barn! Hopefully not in battery cages, but who knows? And, the truth is that they came direct from a farm and were no doubt fresh…so the label was, in fact, true.

Of course, the proof is in the pudding, or, in this case, the yolk. When we got home I cracked open one of those eggs and one of our eggs. Here’s the proof of what free range, pastured hens produce, as compared to production hens. Visually, its striking, but on your taste buds its amazing!

Egg from our pastured poultry on the right.

If you have the opportunity to buy eggs from pastured poultry you’ll never go back, I’m sure. Look for a local CSA, farmers market or food co-op in your neighborhood, or search Local Harvest. And, if you can, ask your egg farmer if you can visit their farm. The legitimate farmer will no doubt be proud to show you around.

Chick Nursery

3 Jul

The latest batch of baby chicks are a month old and almost feathered out, but we plan to keep them in the nursery until they are 3 months old. So, to give them more room to roam and a more “real-life” experience, Eddie made an addition to the brooder – the playground. Almost as big as the nursery, it has a sand floor. In addition to giving them a little grit for their developing craws, it is tidier than the wood shavings and results in less fouling of water and food.

Check it out!

Making Mayo…Easy Peasy!

28 Jun

Mayonnaise made with pasture-raised eggs is golden…thanks to the color of the egg yolks!

Last night’s menu was country-style BBQ ribs and coleslaw, but just a few hours before dinner I found I was low on mayo. No problem! I have home grown eggs, extra virgin olive oil, lemons and Dijon mustard in the larder and fridge. Let’s just whisk up some homemade mayonnaise!

You can substitute milder flavor oils for extra virgin olive oil

I love the flavor of extra virgin olive oil, but if you find it too heavy you can use peanut, canola, safflower or your choice of oil to make this recipe from Gourmet magazine. Easy peasy.

  • 1 large egg yolk, at room temperature (30 minutes)
  • 1/2 teaspoon Dijon mustard
  • 3/4 cup olive or vegetable oil (or a combination), divided
  • 1 teaspoon white-wine vinegar or cider vinegar
  • 1 1/2 teaspoons fresh lemon juice
  • 1/4 teaspoon white pepper

Whisk together egg yolk, mustard, and 1/4 teaspoon salt until combined well. Add about 1/4 cup oil drop by drop, whisking constantly until mixture begins to thicken. Whisk in vinegar and lemon juice, then add remaining 1/2 cup oil in a very slow, thin stream, whisking constantly until well blended. If at any time it appears that oil is not being incorporated, stop adding oil and whisk mixture vigorously until smooth, then continue adding oil. Whisk in salt to taste and white pepper. Chill, surface covered with plastic wrap, until ready to use.

Cole Slaw Gone to College

When we were on our RV trip in Oregon last month we discovered an interesting market in Eugene. The Market of Choice chefs create new and interesting dishes in their deli section every day and we were fortunate to be there on the day they were serving a kick-it-up-a-notch cole slaw. We took it back to the motor home, had it for dinner, and analyzed the ingredients. We identified tomatoes, cucumbers and either apples or jicama in this sweet, crisp and tangy mix.

Here’s my version of their recipe, including my homemade mayonnaise. If you don’t want to bother with making the mayonnaise, just use bottled mayo and omit the teaspoon of sugar I added to the dressing.

Ready to eat slaw mix…kicked up a notch with jicama and cucumber!

  • 4 cups slaw mix (shredded green cabbage, purple cabbage and carrots).
  • ½ cup peeled and diced jicama
  • ½ cup peeled and diced cucumbers
  • 3 medium tomatoes
  • ¾ to 1 cup mayonnaise…depending on how saucy you like the slaw
  • 1 teaspoon sugar (omit if using bottled mayo)
  • 2 tablespoons coarsely chopped flat leaf parsley
  • ¼ cup Thompson seedless raisins

Dressing should look a little bit like Thousand Island because of the fresh tomatoes.

Toss slaw mix with chopped jicama, cucumbers and raisins. In blender, pulse mayo, tomatoes and parsley until roughly mixed. Add and stir into slaw and refrigerate at least one hour, until raisins are soft.

Enjoy!

Lupe’s Mini-Cooper

14 May

Our friend Lupe kept chickens for years and is particularly fond of Frizzles and Japanese Silkies, but she was diagnosed with MS several years ago and is now partially disabled, making it difficult for her to tend to a flock. Recently she came to see our new chicks and remarked on how she’d like to have just two hens, so Eddie engineered a solution. Of course he did!

Sue and Lupe had a ramp built that will give Lupe walker-access to the enclosed side yard that will be the chicken run. Then Eddie measured the space and went to his shop to design and build a handicap-accessible coop!

It is built on legs, so that it fits up against the ramp. The next box is set at precisely the right level and has a nifty catch that will allow Lupe to gather eggs with one hand when she is using the walker. The roost bars also serve as a “ladder” to the nest box.

When we ordered chicks from the hatchery this spring we included six straight run (unsexed) Japanese silkies. When they are big enough for Lupe to tend to we’ll identify two hens and move them to her coop. What a joyful day that will be!

Adult Silkie hen and rooster…I hope I can figure out which is which when the chicks grow up!

Kopytka

5 Jan

A few weeks ago Eddie told me he’d had a dream the night before in which he was watching his mother make one of his favorite Polish foods, and that he was going to try and duplicate what he saw in the dream.

Kopytka, literally translated from Polish as “little hooves”, is a pasta made from mashed potatoes, flour and egg. The dumplings are boiled and then served with soup or gravy or fried in bacon fat and topped with crumbled bacon. (My mouth just watered a little bit!)

Eddie made his first attempt at the recipe while I was at a business meeting one afternoon. Unfortunately, he ran low on flour and had a little trouble working with them, but they were delicious! The next time we worked together and I photographed the process. It is really quite simple and the result is SO worth it! Here’s the recipe and some visual  instruction.

4 medium potatoes, boiled and mashed
2 ½ to 3 cups flour
2 medium eggs
2 tsp. salt
1 tsp. pepper

Place mashed, cooled potatoes in large bowl. Lightly beat eggs with salt and pepper and mix into potatoes. Gradually add flour, 1 cup at a time, until dough becomes sticky. Turn out onto floured surface, kneading in more flour until dough is smooth and pliable.

Break into balls about the size of a small orange and then shape into logs about 1” in diameter. With a sharp knife, cut logs on a bias about ½” thick.

In a large pot, bring water to a boil and add dumplings slowly so they do not “clump” together. When they rise to the top, reduce the temperature and cook for 3 to 5 minutes while stirring occasionally.

Pour dumplings into colander and rinse with cold water. Serve with goulash or pot roast or fry them lightly in bacon fat and top with crumbled bacon. 

Eddie’s Tree House

1 Jan

When we planted the orchard two years ago, Eddie built PVC frames and covered them with plastic netting to keep the birds from stealing the fruit, but when the first peach tree was almost ready to harvest we discovered that squirrels had chewed through the netting and taken EVERY SINGLE ONE of the peaches.

The first cage Eddie built to replace the net covered structures, as seen at right.

Eddie quickly built “cages” around the remaining trees and we managed to keep most of the first year’s fruit. He felt it was too crowded, though, when we had to go inside to pick, prune or spray, so he began engineering “the tree house”. It took him about 3 months to disassemble the panels from the cages, and then measure, design and construct the 3000 square foot enclosure. He recycled the panels from the cages and of course had to install supports, build more panels and cover the top with avian wire.

Putting on the finishing touches.

Spraying was a cinch this year...lots of room to move around.

It's a masterpiece, Eddie!

He’s a mechanical genius and a tireless worker, and although I worried constantly about him being on the ladder and scaffolding, everything went fine and the result is beautiful! We’re looking forward to a spring blossom party in there!

Lemon Drop Martinis

14 Dec

When I sent out the Pomegranate Martini post yesterday, a couple of folks asked for the Lemon Drop Martini recipe, so here you go! We have a Meyer Lemon tree and when the fruit is in season this is a regular (at least once a week) treat at Eddie’s Bar.

1 1/2 ounces vodka
1/2 ounce Triple Sec
1 teaspoon superfine sugar
3/4 ounce fresh lemon juice
4 -5 ice cubes
Small plate of superfine sugar, for the martini glass rim
Lemon twist

  1. Chill martini glasses in freezer for at least 10 minutes prior to serving.
  2. Place Vodka, Triple Sec, lemon juice and sugar into a cocktail shaker with 4-5 ice cubes and shake vigorously for 30 seconds to 1 minute, until shaker is icy.
  3. Run the lemon twist around the edge of the chilled martini glass and dip in a small amount of superfine sugar for a coated rim.
  4. Pour the strained martini into the chilled glasses and serve.

Cheers!

Holiday Pom Tinis!

13 Dec

Our neighbor, Cynthia, has an enormous old pomegranate tree in her back yard, and so much fruit falls on the ground that every few days she picks them up, breaks them in half and tosses them over the fence to our chickens.

Last week I was in the hen yard when she was treating the girls. We had a little chat about how juicy the pomegranates are this year and how much the chickens love them. Then I gathered up a dozen eggs for her and she brought me half a grocery bag full of fruit. Last year she made a beautiful jelly from them, but she said the work involved was hardly worth it and suggested I use them for martinis instead. Brilliant!

Until last week I had never juiced a pomegranate, but a little web research later I found it wasn’t that difficult to do – using an ordinary citrus squeezer and then straining juice through a fine sieve. I adapted this recipe from Oprah and Rachel Ray and I think you’ll find it a beautiful and tasty holiday beverage.

2 ounces fresh squeezed pomegranate juice
3 ounces Absolute Citron vodka
1 ½ ounces Triple Sec
Cup of ice
Squeeze of lemon

Chill martini glasses in freezer for at least ½ hour. Place all ingredients except ice into shaker. Use slice of lemon to moisten the rim of glasses and then coat with sugar…I prefer superfine baker’s sugar for cocktail trims.

Add ice to shaker and shake vigorously for 2 to 3 minutes or until container is icy cold. Pour into sugar-rimmed glasses and serve.

Cheers!

Drunken Fig Jam

29 Oct

This year our Black Mission Fig tree went bananas! Groans acknowledged and appreciated. Perhaps it was the rather brutal pruning we gave it last year that sent it into stress and compelled it to reproduce in the form of blooms, fruit and seeds.

I love walking past that tree every morning on my way down to the barnyard, and at this time of year I often have breakfast on the way, plucking the low-hanging fruit for an indescribably sweet, chilled taste of fall. Nevertheless, one can only eat so many fresh figs and I haven’t mastered the dehydrator.

Last year I found this recipe for Drunken Fig Jam and made a few jars of the sweet, savory condiment. This year I’ve already canned a dozen half-pint jars…I’m thinking Christmas presents. If you can get your hands on four pounds of figs — preferably Black Mission but other figs will do — this jam works with both sweet and savory dishes and goes nicely with lamb chops, over pancakes or on a piece of crusty bread with a schmear of chevre or brie cheese.

Below is my slightly altered recipe from Epicurious…I only reduced the sugar from four cups to three.

INGREDIENTS

2 lemons
4 pounds ripe fresh figs (preferably black), stemmed, cut into 1/2-inch pieces (about 9 cups)
3 cups sugar
3/4 cup brandy or Cognac
1/2 teaspoon coarse kosher salt


Using a vegetable peeler, remove thin outer rind from lemons in long strips, peeling from top to bottom of fruit. Cut  into matchstick-size strips (about 3 tablespoons).

Remove stem ends and chop figs into 1/2 inch pieces.  Combine lemon peel, figs, sugar, brandy and salt in heavy, deep saucepan. Let stand at room temperature for one hour, stirring occasionally.

Bring fig mixture to boil over medium-high heat, stirring until sugar dissolves. Reduce heat to medium. Continue to boil until jam thickens and is reduced to 6 cups, stirring frequently and occasionally mashing mixture with potato masher to crush large fig pieces, 30 to 35 minutes. Remove from heat.


Ladle mixture into 6 hot, sterilized 1/2-pint glass canning jars, leaving 1/4-inch space at top of jars. Remove any air bubbles. Wipe jar threads and rims with clean damp cloth. Cover with hot lids and apply screw bands. Process jars in pot of boiling water for 10 minutes. Cool jars completely. Store in cool, dark place for up to 1 year.

And then, what to do with those peeled lemons? Well, in the spirit of drunken fruit, how about Lemon Drop Martinis?

Cheers!

Christening the Chooks

10 Oct
Colette and Yvette are Black Copper Marans.

I’ve always been a collector… from buttons when I was a child to vintage table linens, Mexican folk art and Italian art glass as an adult. So when we began raising chickens a year or so ago, I collected sets…two of each breed. Because we purchased full-grown birds I could select them based on distinctive feather patterns, unique combs, leg color and other recognizable markings. This allowed me to identify and name each hen, which was fun and would later be helpful in sorting them all out.

This year we decided to raise baby chicks…25 of them. Now we have more birds of each breed with little variance in their appearance, so figuring out who-is-who is a bit of a challenge. Nevertheless, some of them have already acquired names.

The first batch of chicks we brought home were six Black Copper Marans, a French breed that is prized for dark, terra cotta colored eggs. At 4 months old we knew two of them were roosters – which we do not keep – so they were named Fried and Fricaseed. Fortunately, another poultry fancier of our acquaintance wanted them for breeding, so they were given a reprieve from their monikers.

The hens – Guillemette, Juliette, Colette and Yvette – are each unique in that two of them have feathered legs and two do not. Guillemette and Juliette, of the feathered legs, have distinct mantles and are easy to tell apart. The same is true of Colette and Yvette, the bare legged girls.

Two other easily recognizable hens in our flock are Antoinette and Bernadette. They are Dominiques, which resemble the Barred Plymouth Rock. Dominiques are considered the oldest breed in the US, the first breed recognized by the American Poultry Association. Sadly, they are on the “watch list” of endangered domestic chickens (fewer than 5,000 breeding birds in the United States, with ten or fewer primary breeding flocks, and globally endangered).

These threatened breeds are often no longer actively bred due to modern commercialization or industrial applications of the animal. Endangered breeds of chickens are often pushed aside in favor of poultry that matures faster, gains more weight in specific areas (plump, juicy breast and thighs, meatier wings, etc.) or has a higher egg production rate.

Because we do not keep roosters or breed chicks, we are not directly contributing to the preservation of a diverse chicken population. However, by purchasing chicks of these endangered species we support those who keep the breeding flocks of birds that are threatened with extinction.

Two Ways to Preserve Tomatoes

3 Oct

Every year, in addition to marinara, I make oven-roasted tomato paste to preserve my harvest.  This year I also decided to try my friend Denise’s Balsamic Tomato Jam. I serve this spicy, sweet and savory spread on a slice of chewy bread with a shmear of chevre cheese or cream cheese.

Six pounds of tomatoes yielded 7 half-pint jars of jam, two of which have already flown out the door. Here’s Denise’s recipe for 1 ½ pounds of tomatoes.

Balsamic Tomato Jam

6 allspice berries
6 whole cloves
½ tsp. crushed red pepper flakes
¼ tsp. mustard seeds
1-1/2 lbs. ripe tomatoes
1 c. sugar
½ c. balsamic vinegar
1 tsp. salt
½ tsp. pepper

Combine the allspice, cloves, red pepper flakes & mustard seeds in a piece of cheese cloth and tie securely with kitchen string to form a spice bag.

Scald tomatoes. When skins split plunge in cold water to stop the cooking and peel.

I used a variety of heirloom slicer and salad tomatoes.

Remove tough stem area in center of fruit, slice and dice.

Place the tomatoes and all remaining ingredients in a heavy saucepan.  Add the spice bag, with the string hanging out of the pan.  Slowly bring to a boil, then reduce heat and simmer for 30 minutes (or until reduced to 1-1/4 cup).  Stir frequently. Remove from heat, cool and refrigerate (or pack boiling jam in sterilized jars to preserve).

NOTE: If you multiply this recipe you will need longer cooking time to reduce the jam and should remove the spice bag after 30 minutes.

Jam joins the other preserved goodies in the pantry.

Roasted Tomato Paste

I add small amounts of this concentrated, slightly caramelized tomato paste to soups and sauces, or chop it finely as a spread for bruschetta.

Five pounds of tomatoes halved and spread in a single layer, drizzled with plenty of extra virgin olive oil and sprinkled with sea salt. Roast about 3 hours in 300 degree oven until dried.


Five pounds of tomatoes yielded less than 1 cup of roasted tomato paste, but it is so intensely flavored that it goes a long way and can be frozen in small bags or containers.
 

Mamma Mia Marinara

21 Sep

The first cherry and grape tomatoes in our vegetable garden are usually eaten IN the garden with a salt shaker in hand, and the first slicers are the basis for countless BLTs, Caprese Salad and gazpacho. Now, at the end of summer, the vines are loaded with ripe Romas, San Marzanos and other sauce tomatoes, which must be harvested every few days.

I make marinara almost every weekend for at least a month, preserving the bright summer flavors that we will enjoy throughout winter. The process begins with about 15 pounds of fresh tomatoes, washed, halved and run through one of my favorite Italian kitchen gadgets, the spremmi pomodoro.

This macchina miracolosa separates the skin and the seeds quickly and efficiently. Nothing goes to waste because the hens love the discarded skins and seeds. From 15 pounds of tomatoes I usually get a gallon of sauce for marinara.

To the sauce add roughly ½ cup of olive oil and one head of garlic, peeled and diced finely. Uncovered, bring the pot to a boil and then lower the heat to a high simmer to reduce the sauce to about half.

Simmer for 3 to 4 hours until the sauce has thickened. Add ¼ cup of Italian Seasoning, 2 bay leaves and ¼ cup dried basil and continue cooking on low heat for about half an hour.

When the marinara has cooled I pack it in ZipLock containers, mark and date them, and put them in the freezer. This may seem like a lot of effort, but the result is so incredibly different from any bottled marinara and makes an excellent base for the classic Sicilian Sunday Gravy.

Mangia! Mangia!

Fawn Rescue

17 Sep

Yesterday, for the second time this week, a fawn tried to squeeze through the fence between us and our neighbors. Our property is basically deer-proofed, but this little guy was small enough to get his head, shoulders and front legs through, only to get stuck at the hips.

On Monday, Eddie was in the golf cart on his way to pick up the mail when he saw something move and heard a horrible scream from the side of the driveway. He stopped and found that a fawn was trying to get into the neighbors yard through the fence and was hopelessly trapped. We have no idea how he got into our property in the first place, but there he was. Eddie and his friend John managed to pry the fence rails apart so they could lift the little guy up and through.

Yesterday I was in the vegetable garden and Eddie encountered the same scenario on his way to mailbox. Suddenly I heard this blood-curdling scream (from the deer) and Eddie yelling at me to come up and help him.  This time the fawn was facing the other direction, with his head and shoulders on our side of the fence. This would be a bit trickier, since we didn’t want to get bitten or slashed by his sharp hooves.

My husband, always the engineer, said “We need some tools.” Back in the golf cart and down to the barn for clamps, and then to the garage for cloth shopping bags and dog leashes. Eddie applied some pressure clamps to the fence rails and managed to get the fawn’s head and front legs into the cloth sack, which made him go quiet and still. Then we lifted him up and pulled him though.

Eddie tied up his back legs, put him in the back of the golf cart and we slowly made our way down the driveway, out the gate and to the front of our neighbors’ yard, where the doe was frantically running along the fence line. Eddie lowered the little guy to the street and removed the dog leashes and sack carefully. The wounds on his hips  from earlier this week haven’t healed yet and the ones he incurred yesterday were even more gruesome, but he hopped up and ran straight to Mama.

I didn’t manage to get a picture of him leaving because he was out of there and into the trees before I could focus. But here’s how I imagine them. I hope Mama is giving him an earful…counseling him to not try that again!

Ooh-la-la! Coq au Vin!

6 Sep

Two of my favorite things...chicken and wine!

A few days ago I pulled the last of the Super Sweet Walla Walla onion babies from the garden and harvested the last of the Romano beans. I remembered that I had some leftover parsley-buttered Baby Yukon potatoes in the fridge and decided that all I needed for Coq au Vin was a coq…which I had in the freezer.

Recipe for 2 hearty plates:

2 legs, 2 thighs and 2 wings from a Surfside Chickens pastured broiler, cut in pieces and dredged in flour.
6 large green onions or 12 to 15 pearl onions
2 cloves garlic, finely minced
2 cans mushroom stems and pieces (in this dish I prefer them to fresh mushrooms)
2 cups dry white wine (most recipes call for red wine…I prefer white)
3-4 Tablespoons vegetable oil
3 Tablespoons Herbs deProvence
Corn starch…al gusto

Cook a few pieces at a time so pan is not crowded.

Prepare the chicken by dredging in flour. Sprinkle with kosher salt and pepper and sauté until golden. Remove chicken pieces from pan, and add whole onions. 

You can see all the lovely brown bits in the bottom of the pan. Don't throw them out!

Sauté until cut ends start to brown. Remove the onions and add garlic. When the garlic just begins to soften, add white wine and stir to remove brown bits in the bottom of the pan.

You can use more or less corn starch to sauce to achieve the consistency you prefer. I like a thin gravy, myself.

Add mushrooms and the water in the can, keeping about ¼ cup in reserve. Add Herbs de Provence and simmer uncovered for 15 minutes. Add chicken and onion to sauce, cover and simmer for 30 minutes. If the sauce looks too thick you can add chicken broth to keep it “soupy”.

 After meat on drumsticks begins to loosen from the bone, add cornstarch to remaining mushroom water and mix thoroughly to make a thin paste. Slowly add this to sauce, stirring constantly. (You can make the sauce thicker by using more of the mixture. Add a small amount at a time, cooking and stirring until it gets to the consistency you prefer.) Reduce heat to simmer for about 5 minutes.

I then heated and slightly mashed the parsley-buttered potatoes, steamed and buttered the Romano beans, plated the chicken with the sauce as a gravy over the potatoes, and, yes, I’m going to say it…sorry, I can’t resist…Voila!

Bon apetit!

Can I Get an Ole!

6 Sep

When my daughter Mari, and her business partner, Beth, had the Shade Tree Restaurant  in Chico they made massive quantities of guacamole every day. One of the interesting and delicious things about their guac recipe is that it doesn’t use onion, which can overpower the other milder flavors in the mix. I’ve been using Mari’s technique for many years and have kicked it up a notch with the addition of grated Cotija cheese. Here’s how easy it is.

2 ripe but firm avocados
1 medium tomato, seeded and diced
1 or 2 jalapenos (depending on your heat tolerance), seeded and chopped
1 large clove garlic, finely diced
2 Tablespoons minced cilantro
Juice of 1 lime
¼ cup grated Cotija cheese (a hard, skim milk cheese fromMexico)

Mash avocados lightly to leave good size chunks. Add remaining ingredients and mix. The Cotija cheese is quite salty, so don’t add salt until the guac rests and chills for awhile. Taste prior to plating and salt as needed.

TIP: Keep guacamole from browning by placing plastic wrap directly over the mixture and removing as much air as possible before chilling.


Flautas de Pollo

One of my favorite ways to enjoy guacamole is with Chicken Flautas. Anything fried is fine with me, and RE-fried is even better! Start with 2 chicken breasts, boiled or roasted, salted and shredded. Fry 10 corn tortillas in hot oil until tender but firm.

Place chicken on tortilla and roll up tightly.

Place on serving dish, folded edge down. Heat oil to almost smoking and fry a few at a time with the folded side down until crispy.

Turn 3 times until they are all golden brown.

Serve with guacamole and sour cream.

The perfect cocktail for spicy guacamole!

 And, yes,  the frozen margarita is de rigor! I use Golden Margarita Mix from Costco, which already has the tequila in it. Fill glass with ice, add Golden Margarita Mix and add another splash of Cuervo (unless you’re a lightweight) and a splash of Triple Sec. I use a Vitamax blender and blend on High until it becomes the perfect adult slushie. Salt rim of glass with sea salt and pour cocktail.

Ay yay yay, Mama!


Platanos Machos…Que Ricos!

4 Aug

Ripe plantains on top of green plantains

Last year Eddie and I started seeing articles in the AARP magazine about the benefits of a “banana a day”.  Here are just a few of them. Banana Benefits.

So we have made it a habit to eat LOTS of bananas – plain, with cold cereal, in smoothies, in fruit salad, with wheat toast and peanut butter, and in banana bread (where they probably lose some of their healing properties due to baking).

I don’t exactly have to choke them down, but I loves me some variety. At our local Mexican food market last week I saw a beautiful pile of platanos machos and decided to introduce my husband to a classic, simple and scrumptious Latin American  dessert…Platanos Fritos con Crema.

Recipe for Two

Peel 2 ripe plantains (ripe plantains are yellow with black spots). Cut in half and then slice into 3 pieces.Heat peanut oil or canola oil about ¼ inch deep in sauté pan and add sliced plantains. Adjust heat so that it cooks the plantains quickly without burning or smoking.

A cast iron skillet does a nice job of caramelizing the fruit.

Fry to golden, transfer to paper towel to drain and serve immediately with dollops of sweetened sour cream. I add about 2 tablespoons of white sugar to ½ cup of sour cream and mix well. You can also simply sprinkle the fried plantains with sugar and drizzle them with sour cream. And, if you want to save on calories you can top them with plain yogurt.

Looks good, tastes good, good for you!

Well, Eddie loved them and they will be changing up our banana regimen a bit. I hope you can find them in your market and give them a try! Buen provecho!

Pickled Beets

31 Jul

Growing up in Wisconsin, I loathed the month of August. That’s when my mother harvested and canned her fruits and vegetables. As the eldest daughter, I was expected to help her peel carrots and apples, snap green beans, blanch tomatoes, chop onions, pit peaches, and whatever else needed to be done to make sure the shelves in the root cellar were stocked for the winter.

The water bath canner and pressure cooker going full tilt made the already steamy summer days almost unbearable, and the only thing on my mind was how soon I could get out of the kitchen and go jump in the lake.

Nevertheless, at the end of summer, the sight of the shelves lined with jewel-like bottles of vegetables, fruits, sauces, jams and pickles was very satisfying. One of my favorite home-canned foods was Pickled Beets, a Midwestern farm classic. Opening a jar of them when the snow was six feet deep outside the door could bring back summer in a heartbeat.

This morning I harvested the first crop of baby beets from our garden and made six pints of those rustic, ruby pickles. The kitchen was hot and steamy, my hands were stained crimson and the scent of vinegar and spices was intoxicating. I thought of my mother several times and felt grateful for how hard she worked to feed us and teach us how to feed ourselves. And now I’m going to jump in the lake! Well, the pool, that is.

Irena Goes to the Henitentiary

11 Jul

This spring three of our hens have gone “broody”, meaning they want to sit on their eggs and hatch baby chicks. Because we have no roosters and thus no fertile eggs, it’s a pointless exercise. Also, it means the hen is not earning her keep, as she quits laying eggs once the broodiness sets in. If not discouraged from this, she may stop laying  for several weeks or even months.

The brooding cycle can also have some negative consequences for the wannabe mama. She will often leave the nest only once or twice in a 24 hour period to eat, drink and defecate – in the form of a particularly large and malodorous chicken dropping – so it is necessary to take her out of the nest several times a day. Her temperature also rises and she may pull the feathers from her breast, the better to warm the eggs. All this can happen even without a single egg in the nest!

Our approach is to “break the brood” as soon as we see signs of it. The first time we experienced this phenomenon with Natasha Nogudnik we researched it on the web and tried out various methods, including removing her from the nest several times a day, dipping her tummy in cold water, and finally isolating her in a dog crate for a week. The isolation seems to do the trick.

This year Eddie converted the chick nursery to a “henitentiary” by removing the floor and replacing it with wire, making it impossible for the hen to nest. We put it in a cool room inside the barn and placed Henrietta, a Welsummer, and Antoinette, a Cuckoo Marans inside. Within a week they snapped out of it and were allowed to return to the general population.

Last week we noticed Irena Szevinska, a Polish hen, was spending more and more time on the nest and protested loudly, puffing out her feathers and pecking at us, when we tried to remove her. So she was sentenced to solitary confinement in the henitentiary for a few days.

This morning I let her out and she cackled loudly, ran around the hen yard, ate some hen scratch, and finally settled herself into a nice long dust bath. Welcome back, Irena! Now let’s get started on that egg business again.

All American Tacos!

23 Jun

Last week I had a hankerin’ for what my kids used to call American Tacos (as opposed to Mexican tacos, which are quite different from Tex Mex or Taco Bell offerings). I’m talking about a classic, crisp-fried corn tortilla shell, seasoned ground beef filling, shredded Iceberg lettuce, grated cheddar cheese and fresh salsa.

So off I went to the market to buy my ingredients. When I returned I realized I had no store-bought taco seasoning, which is key to a genuine American Taco! Not willing to brave the aisles again I searched for and found a taco seasoning mix recipe, which Eddie quickly put together for me.

Taco Seasoning

2 tablespoons chili powder
1/2 teaspoon garlic powder
1/2 teaspoon onion powder
1/2 teaspoon red pepper flakes
1/2 teaspoon dried oregano
1 teaspoon paprika
1 tablespoon ground cumin
2 teaspoons sea salt
2 teaspoons black pepper

Mix well by shaking together in a small airtight jar.

My second homemade ingredient was fresh salsa, though some might argue that bottled salsa would make these more authentically American. Oh well.

Pico de Gallo

2 large ripe tomatoes
2 large jalapeno peppers (seed them if you want a milder salsa)
2 scallions
1 clove garlic
3 tablespoons chopped cilantro

Dice all ingredients, mix and salt to taste. Refrigerate for at least 1/2 hour.

Taco Prep

Click on image for larger view.

For the filling I simply brown a pound of lean ground beef and mix in 3 tablespoons of the taco seasoning when the meat is almost done. I then shred the lettuce, grate the cheese and fry the taco shells.

The taco shells require a little attention, but basically you fry the the corn tortilla in very hot oil (deep enough to cover the tortilla) until it is somewhat firm. Next you fold it in half and quickly fry it on both sides, while holding it open with tongs so that when it is done there is an opening wide enough to fill it. I drain the shells on paper towels sitting up on their edges.

Fill shells with seasoned ground beef mixture, a layer of grated cheddar, a layer of lettuce and finally the salsa. If you want to get fancy pants you can also add a dollop of sour cream or slices of avocado.

The combination of crispy, savory, creamy, and piquant flavors made for a fiesta in my mouth and brought back sweet memories of making this meal for my children. Viva El Taco Americano!

Crazy Chicken Ladies

25 May

I am not alone! In April we saw a flyer at the feed store announcing an Open Coop Tour and an invitation for local poultry fanciers to open their coops to visitors on May 1. So we did…and it was satisfying and fun to share our experiences and enthusiasm for backyard chickens on the Coop d’ Hill tour.

I also met some more of my “peeps” in Morgan Hill. Among them is Kate of Artisan Eggs, who organized the open coop event and stopped by to deliver a poster/sign for our gate. Kate and her husband live just down the road from us and produce beautiful eggs from some very pampered poultry. Kate and I discovered that we had purchased Black Copper Marans from the same batch of chicks, making us related in some peculiar but pleasant way.

Then, less than a week later a friend recommended Alice Walker’s new book The Chicken Chronicles. Oh. My. Goodness! I was instantly captivated and had to force myself to read it slowly and savor her words.

Perhaps you’ve seen her? A photograph of her, maybe? She is an old woman, round, comfy, wearing a dark-colored headscarf – so maybe she’s in Turkey, or Egypt or Pakistan, Afghanistan or Iraq – sitting under a tree, or maybe she’s on a bench that’s against a wall. Outside anyway and she’s gazing in complete peace at a flock of geese in front of her. But there she is, and peace is with her. How is this? That is the mystery I have fallen into with my chickens. I sit in the corner of the chicken yard on my little green stool, Babe in my lap, Gertrude S. in my lap, and I’m there. Eternity. How long have humans and nonhumans been carrying on this way? – Alice Walker

Every morning I have my first cup of coffee while sitting on my stool in the henyard, watching my little yard birds forage and fuss over who gets what piece of scratch, preening themselves, making a beeline for the nest box to take care of some egg business, chasing off the blue jays or squirrels who come into the yard for a quick snack, or hopping up on the sink beside me to give me a long, curious stare. My hens don’t sit in my lap, like Alice Walkers’ hens do…but just observing them every day centers me and gives me a powerful sense of gratitude for the Earth and its gifts.

When we started this hobby/folly with one coop and a few hens we had NO IDEA what we were getting into! Eddie is such an indulgent and thoughtful husband…and he loves to build things, but we never dreamed we’d become so attached, interested and amused.

These days, when I open the coops and let the 17 hens out of Eggs R Us I look at them and think how amazing it will be to see their numbers doubled in the coming months. We have 25 chicks that we’ve raised from a few days old in the laundry room and then the chicken tractor. We recently moved them all into Coop de Ville and Coopacabana, and here’s a video update on their status.

We are already selling beautiful, fresh, organic and free-range eggs to our neighbors who are both delighted and grateful. We do not profit financially, but their donations help pay for chicken feed and support our hobby.  Now, that’s not so crazy, is it?

Egg Salad and Green Garlic

18 May

At the Farmer’s Market a few weeks ago I made a palate-pleasing discovery…green garlic! I am a huge fan of the “stinking rose” and love it raw, sautéed, roasted, you name it, but the tender young plants sliced into a stir fry or a salad would tempt even a vampire! And, because the “heat” is not yet developed you can use OODLES of it and not overwhelm other flavors, such as eggs.

A few days ago I served egg salad sandwiches for dinner, made with fresh eggs from our backyard flock, chopped celery and red onion, and green garlic, of course. The green garlic looks like a green onion but the leaves are flat and V-shaped, rather than tubular. When you slice it open you can see the tiny cloves inside. I simply peel the bulb, slice in rings and chop.

I used 4 hard boiled eggs and about ½ cup chopped celery, generous amounts of chopped baby red onion and green garlic, mayo, sea salt and fresh ground black pepper to make the egg salad. I don’t like to add any other seasonings because I like to taste the egg…and the garlic, of course.

I also like a rather coarse mixture so I just mix it up and then “smush” it lightly on a plate, adding salt and pepper to taste…which means I usually consume quite a bit of the salad before it hits the sandwich.

Fresh romaine lettuce leaves, and a dense German caraway rye bread and half-sour pickles from our local European deli made this a simple, hearty and tasty dinner.

It is NOT easy to find green garlic…I couldn’t find it in any of our markets except the Farmer’s Market…and it is no doubt a spring season item. Fortunately, we live near Gilroy, the Garlic Capital of the World, so I can begin growing it in my vegetable garden and even in the flower beds for a continuous supply of green garlic… and protection against evil spirits!

Huachinango Jarocha!

7 Apr

In Veracruz many dishes are served in a boat of banana leaves!

My mother-in-law, Maria del Consuelo Rigo de Garrido, was born in the state of Veracruz to Italian immigrants and moved to Mexico City when she was a young woman –  but in the kitchen she remained a Jarocha. Jarocha or jarocho (depending on gender) is a term applied to people born in the southern coastal regions of Veracruz, an area that is known for its seafood dishes. The cuisine of this region also reflects the influence of the Spaniards who made their entry to the Americas here, bringing olives and olive oil, almonds, and spices from around the world.

Huachinango a la Veracruzana, a typical comida casera or home-cooked dish, is one of the many that Consuelo taught me how to make and it remains a favorite in our household. The authentic recipe, like most Mexican dishes, calls for several hours of sauce simmering, and during the years we lived in Mexico I was all about authentic. However, when we returned to the U.S. and I rejoined the work force I quickly found short cuts that put plates on the table within an hour – without sacrificing too much flavor.

Consuelo returned to live in Veracruz several years ago, to the port of Coatzacoalcos. I have visited her there several times, but I rarely get a chance to try my hand in her kitchen. The next time I’m there I will prepare this “quicker” version of spicy, tomato-sauced Red Snapper for her. We’ll see if it passes her taste test. Vamos a ver!

RECIPE

3 filets Red Snapper

4 tablespoons olive oil

2 cups fresh salsa picante (bottled works, but not as well)

1 14 oz. can of diced canned tomatoes with juice

2 cloves garlic, diced

½ cup sliced olives (large pimiento stuffed)

1 bunch cilantro

Salt to taste

Lime quarters

Pour olive oil into large skillet with a glass cover. When oil is warm add fresh salsa. If you can only find “mild” salsa you may add chopped jalapeno or serrano chiles, depending on your taste. Saute until onions are soft and add diced tomatoes, garlic and olives. Cover and simmer about 15 minutes and salt to taste. Do not add salt until this step is complete, as olives may vary in salt content.

Place Red Snapper filets, skin side (shiny side) down on sauce and simmer without cover for 2 minutes.

Turn filets, scoop sauce over fish and cover. Simmer for 3 minutes.

Open skillet and cover fish with clean cilantro, stems and all. Cover, bring to boil and turn off burner (cilantro is a fragrant herb and overcooking results in zero flavor). When cilantro has wilted the dish is ready to serve…either removing the cilantro or serving it on the side.

This dish is traditionally served with white rice and lime. I used a brown rice pilaf and served it all up with braised broccoli rabe. The lime juice, squeezed over the entire dish, adds a fresh, piquant flavor to the entire plate.

Buen provecho!

The Delectable Pisco Sour

2 Apr

While visiting South America last month, I enjoyed a couple of Pisco Sours and decided that I would start making them when I got home. Yesterday was the perfect unseasonably hot spring day in which to serve them up, so off I went to BevMo to pick up some Pisco Puro.

Pisco is a strong, clear brandy distilled from “pisco” grapes. It originated over 400 years ago in the Pisco Valley of Peru, where wine grapes were first brought to the land during the Spanish conquest. Due to the ideal growing conditions, a healthy wine-producing industry developed. So healthy, in fact, that the imports from Peru began to threaten Spain’s own wine production, leading King Felipe II to place a ban on the trade of Peruvian wine. Consequently, Peruvian growers began distilling and exporting this grape-based liquor.

During the Gold Rush, merchant ships plied the waters between California and Peru, bringing Pisco to the thirsty souls who inhabited San Francisco. The owner of the Bank Exchange Saloon, Duncan Nicol, is said to have developed the popular Pisco Punch, and travelers such as Mark Twain and Rudyard Kipling lauded the drink.

Patrons enjoying Pisco cocktails at the Bank Exchange Saloon in 1891.

In 1889 Rudyard Kipling immortalized Pisco Punch writing that it “is compounded of the shavings of cherub’s wings, the glory of a tropical dawn, the red clouds of sunset and the fragments of lost epics by dead masters.”

I looked at several recipes for Pisco Sour and used this one to create our tasty late afternoon cocktails. I used Pisco Puro by Don Cesar, and our Vitamix blender on high speed, which does a great job with icy blended drinks. This recipe says it is for two drinks, but it actually made slightly over 4 champagne flutes full. I’d say it’s a recipe for four.

 Ingredients:

  • 4 cups ice cubes
  • 1 cup Pisco Puro
  • 1/3 cup lemon juice
  • 1/3 cup white sugar
  • 1 egg white
  • A good dash of aromatic bitters

Place ice cubes, pisco, lemon juice, sugar, egg white, and bitters in the bowl of a blender. Blend on high speed until finely pureed. Pour into two glasses and garnish with an additional dash of bitters.

Salud!

Between Dancing the Tango and Learning to Surf…

22 Feb

Tango dancers on the streets of La Boca.

I’ll be blogging! On Thursday I leave for two weeks in Buenos Aires, Argentina and Punta del Este, Uruguay with my sister-in-law Renee, our neice Arlene, and her husband Will. Tango and surfing are two items on my bucket list, and although I don’t expect my initial attempts to be graceful, they will certainly be fun.

Miles of beaches in Punta del Este, Uruguay.

Will and Arlene are packing a laptop and I’m packing cameras and a journal to document recetas, recorridas y recuerdos (recipes, tours and memories). Eddie and his family emigrated from Poland to Argentina when he was four years old and lived there until he was 18. Two years ago I wrote a blog about the family’s escape during WWII that you can read here.

Lest We Forget

We will spend a week in Buenos Aires and a week at a beach house in Punta del Este, known as the St. Tropez of South America. Eddie’s oldest sister, Wanda, still lives there and Renee and Arlene visit often, so they know their way around. I am so happy to be traveling with them and seeing the places where Eddie grew up.

Eddie's Adios Argentina party in 1959.

I look forward to sharing videos, photos, recipes and random moments with you…when I’m not in the ocean or on the dance floor, that is!

Hasta pronto!

Critter-Proofing the Garden

30 Jan

Last year our orchard and vegetable garden were pillaged by critters of every stripe…moles, voles, gophers, tree squirrels, ground squirrels and even birds — who scratched, dug and pecked out the seedlings and sprouting crops. When the tree squirrels stole every single one of the ripe donut peaches in a single day, Eddie took action and built wire-screened enclosures around all the trees that still had fruit on them. Then he did the same for the tomato plants. This year, he decided he would simply build an enclosure around the entire veggie garden. I say simply, but it was not, of course. This is a truly awesome construction!

Destruction site and forms for concrete perimiter.

After lots of measuring, drawing up plans and materials lists, he ordered lumber, gopher mesh, avian wire, plumbing materials and concrete. First step was to remove the old fencing and bring in a back hoe to dig out 18 inches of soil. Then our gardener and his crew poured a foundation, lined the garden with gopher mesh, and put all the soil and some amendments BACK in the garden.

Soil is back in the garden, mixed with sand, compost and manure. Ready to GROW!

Butch and Eddie used THOUSANDS of staples to attach the avian wire to the panels.

 It took Eddie and Butch nearly two weeks to erect the frame and cover the top and sides with avian wire. Last of all, Eddie built gates and doors, and re-plumbed the irrigation system and the water to the henhouse.

We will use the supports to mount wires for vertical plants such as tomatoes, peas and green beans.

Three gates provide entry from the barn, the back yard and the hen yard.

We used to have several widely spaced raised beds here, which wasted a lot of ground and made crop rotation rather complex. So, not only will the new garden nearly double our growing space, it will be safe from underground, above ground and overhead bandits! Take THAT, you little varmints!

Ribbons of Memories…Tied With a Bow!

2 Jan

Today I plan to take down the rest of the Christmas decorations and reflect on the great times we enjoyed in 2010. There was granddaughter Amy’s confirmation and birthday celebration in spring; planting the orchard, pool parties and house guests in the summer; our month-long motor home trip and neice Arlene and Will’s magical wedding in the fall;  followed by a Thanksgiving visit from granddaughter Lauren, her husband Marty and our great-granddaughter Samantha from Toronto.  And, no sooner had the table been cleared of Thanksgiving dinner than I began decorating for Christmas…my favorite holiday!

A blue tree for Lila Blue!

The bird tree brightens Eddie's Bar

Deck the halls!

 In early December I went to see the San Francisco Ballet’s Nutcracker with James, Maria and Yazmin…renewing an old family tradition. We took Yazmin for the first time when she was five and the last time we went was when she was 12, so I was tickled when she asked me if I’d like to go with her again this year.

James and Yazmin ready for dinner before the ballet.

Cheers to my lovely 17 year old granddaughter!

Maria, Yazmin and I are ready to see The Nutcracker.

The cast of The Nutcracker.

Christmas lights on City Hall.

On Christmas Eve Mari, Jeremy and Lila Blue arrived, and on Christmas morning LB opened her gifts. So much fun to watch a two-year old enjoy her loot!

I'm so excited...I just can't hide it!

Tea, anyone?

Ralph, Rosamaria, Melissa, Amy, James and Yazmin joined us for Christmas dinner. Eddie roasted a goose and a prime rib, after which we lazed around for awhile and then exchanged more gifts.

That goose is cooked! Cheers!

Yes! It's a polar bear!

Looking back, it has been another wonderful year for our family and we wish you all a healthy, joy-filled and prosperous 2011.

Happy New Year!

Oh...and there's that bow...the first thing to go up and the last one to come down until next year.

Hasta pronto,

Lisa and Eddie

Grateful!

1 Dec

Eddie’s oldest granddaughter Lauren, her husband Marty and our first great-granddaughter, Samantha Mary, left yesterday for their home in Toronto … after two weeks of reunions and celebrations. There was Thanksgiving, of course, and Eddie’s birthday on November 28. Needless to say, a fabulous time was had by all!

We picked the kids up at SFO and then toured a bit of the city, crossed the Golden Gate and had lunch in the Sausalito marina. Dungeness crab is in season so we enjoyed it in salad, pot stickers, crab cakes, etc. Excellent!

Such sparkling blue eyes!

Meeting Samantha was a special occasion for all of us. She is a beautiful baby, blessed with wonderful parents. Marty is a devoted dad and Lauren an adoring and attentive mother. At less than four months old Samantha seemed to adapt to all the running around very well … although when we called Lauren on Tuesday night she said the baby recognized her nursery and was all smiles at being back in her crib.

Marty and Lauren celebrate at Eddie's Bar!

The kids drove to San Diego and the coast for a few days and returned before Thanksgiving. We went to Monterey for lunch on the wharf and a bit of sight-seeing on a perfectly sunny and gorgeous day. We sought but could not find the sea lions, which Lauren remembers so fondly from her childhood visits … but we did spot a sea otter at Asilomar.

A splendid day at Asilomar Beach

The lovely Lauren

James, Yazmin, Ralph, Rosamaria, Melissa and Amy made us 10 at the table on Thanksgiving Day. Eddie smoked one turkey in the Weber and I made a traditional roasted bird in the oven. Lauren’s apple crisp and my homemade pumpkin pies for dessert left us all groaning, but we recovered after a rousing game of 99. This fast, fun and fiercely competitive card game that Lauren showed us how to play certainly woke us up. She and Yazmin were the “last men standing”, but Lauren’s luck of the Irish brought her victory.

The "groaning board"...later the site of a rousing card game.

Lauren and Samantha...ready for the mall, girls?

On Sunday we celebrated Eddie’s 67th birthday with Ralph and his family. They brought dinner, so I got a break from the kitchen. They also brought wonderful gifts, cards, songs, cake and lots of hugs for Grandpa. We feel truly blessed and give thanks once again for a year filled with love and companionship among our family and friends.

Lauren brings on Grandpa's favorite cake...Pastel de Tres Leches!

Hasta pronto!

The Big Chicken

3 Nov

Colette, the youngster, in May 2010

Six months ago we purchased an enormous chicken at the feed store, a Blue Cochin, and named her Colette. She was young, but already twice the size of our other hens. In spite of her size, though, she was frightened of all the other hens and whenever one would approach her she would squawk and run away.

Eddie and I had to laugh at her ungainly “waddle”, which was particularly amusing when she was on the run. We nicknamed her ‘The Big Chicken’, fully intending the double meaning. She finally made a friend, though, with our Itty Biddy the banty hen, and until Biddy was killed by a hawk they were inseparable. She appears briefly in this video of Itty Biddy… in all her big, fluffy splendor.

A few months ago we noticed that Colette was getting even BIGGER, and that her comb and wattles were growing. Still, she remained quite timid. On returning from our long cross-country trip we observed that she had become more self-confident, and one day I saw her doing the “mating dance” around one of the hens. OMG…could she be a ROOSTER?

This weekend we saw him mating and promptly changed his name to Claude. He doesn’t crow, but I researched that on the Internet and found that Cochin roosters don’t crow and Cochin hens don’t cluck…unless they’re laying.

Claude, the rooster, in November 2010

We debated keeping him because he is so decorative, doesn’t crow, and, for a rooster, seems fairly mellow. However, roosters will be roosters, and this morning I watched him terrorize Carmen Miranda to the point that she ran over and hid under the bench where I was sitting. Granted, Carmen is the flightiest of the flock and the other hens aren’t behaving that way. Still, I thought to myself, “I’m sorry, Claude, but you’ll have to go.”

Eddie and I discussed his future on Three Dog Farm and decided that we want to maintain peace in the hen yard. I’ve left messages for several of my local chicken-keeping friends and I’m sure someone will be happy to take ‘The Big Chicken’.

Au revoir et bonne chance, Claude! Vous êtes très beau!

A Fairy Tale Wedding

5 Oct

Guests blew bubbles instead of throwing rice or bird seed...beautiful!

I’ve had lots of messages already this week…where are the wedding pix, already! Well, my camera decided to experience random failures, focusing problems and viewing issues this week of all weeks, so I didn’t get ANY wedding pictures. Oh well, I thought, there are so many professional and amateur photographers here I’ll get copies later.

Finally! Our granddaughter Melissa sent me a few from her phone last night and then one of Arlene’s bridesmaids, Corinna, posted her photos on Facebook today, so I  am sharing  some of them here, with a little commentary. There are a lot more fun photos, videos and stories, but here’s a small sampling of the beautiful, thoughtful and joyful event.

We all got teary, including the bride, during the solo of Ave Maria.

The beautiful bride and her gorgeous Mama, Eddie's sister Renee

After the ceremony Arlene and Will took pictures with the horses who stayed overnight at the Whitestone barn and pasture.

I hope you'll adjust, Chester, to the fact that Will has taken your place as Arlene's first love.

The first dance began as a romantic waltz and suddenly transitioned into a steamy tango! They were incredible!

Proud Papa Helmut dances with his princess.

The bridal party.

Chillin’ on Flagler Beach

25 Sep

After 3 days of watching the tide come in and go out, we have gotten into a lovely rhythm of rest and recreation on Flagler Beach. My sister Kate has joined us here and is also taking a much needed break.

It was raining on Thursday morning so we went to the village for manis and pedis and by the time we returned the sun was out. So we put our camp chairs in the surf, filled our sippie cups with wine and just let the water roll over us. We were still there when the tide turned and a big wave rolled over us….and our sippie cups. Taking her next drink Kate remarked, “Now that’s a rather briny brew.”

Kate and I sat in the surf and watched the tide go out and come in.

Yesterday we drove into St. Augustine for the trolley tour of the old city and visited Villa Zorayda, a replica of one of the small villas within Spain’s Alhambra Castle. This scale model re-creation of the Torre de las Infantas is chock full of artifacts from around the world, collected mostly in the 1800s by the architect and subsequent owners. If you visit St. Augustine it is worthy of at least a one hour tour.

The "harem window" of Villa Zorayda

Last time I visited Kate I wrote a blog about St. Augustine. If you’d like to know more about the city’s history click here. I also posted photos from that trip, including our visit to the World Golf Hall of Fame, which you can view here. Best viewed as full screen slide show.

After that we stopped by Kate’s house, which she has almost finished remodeling/restoring. Built in 1959, it is classic Florida and she has done all she can to retain its “mid-century modern” style. She just completed a new patio and “outdoor room” in the back yard, and I’m sure it will become “party central”. Beautiful!

Backyard view of Kate's new "outdoor room".

Last night Kate and her fella, Mike, took us to a restaurant on Flagler Beach, where we ate alligator tail, grouper, scallops, shrimp and prime rib. The portions were HUGE, so we all left with to-go plates. Absolutely fabulous!

We’ll be pulling out on Monday and heading north to Atlanta, Georgia and then to Knoxville, Tennessee, where once again we’ll sit still for a week or so, but we’ve still got two days to play, so I’m going out for a walk on the beach now. 

I’ve posted an album of our last few days here, which you can see by clicking here.

Hasta pronto!

From Sea to Shining Sea!

21 Sep


We’ve had a great time getting here, but the best part is always reaching our destination, especially when the destination is SMACK DAB in front of the Atlantic Ocean! Driving across the Intracoastal Waterway to Flagler Beach, we breathed a mutual sigh of relief after 8 days of one-nighters, and the hooking and unhooking, stowing, and battening down of doors, drawers, fridge, etc. that must be done every time you pull in or pull out.

Today we are all hooked up at the Beverly Beach Camptown RV Park and looking forward to sitting still for six nights. Tomorrow I have some work projects, Eddie has some fiddle-faddling to do around the rig, and La Casita will get a wash and wax. Tomorrow evening my sister Kate, who lives in St. Augustine, will arrive and we will commence our long weekend visit with her.

The view from our rig...watching the tide roll in!

When I returned from wading in the warm ocean water I told Eddie that next fall I’d love to come and stay here for a month. This park is one of the few RV resorts in the U.S. that is situated directly on the beach and the view out our front window is truly breathtaking! We are literally on the edge of the breakwater and the sound of the surf  will help us sleep like babies tonight. We’ve been watching the gulls and para-surfers wing by in front of us, thanking the Universe for our good fortune, and thanking La Casita for being such a trouper in this coast-to-coast journey.

Eddie and I taking in the sea breezes next to La Casita's big ole wheel hub. She's definitely a ROCK STAR bus!

Hasta pronto!

Cajun or Creole?

20 Sep


While Eddie and I were scarfing down our crawfish, andouille and boudin feast in Baton Rouge yesterday, he asked me between bites, “Do you know the difference between Creole and Cajun food?”

Based on my quotidian understanding of the terms Creole (in Spanish criollo…a person of European descent born in the West Indies or Spanish America) and Cajun (a derivative of Acadian), I told him that it was the difference between fancy and plain, or city and country. Well, boy howdy, the Internet proved me right.

The Creoles came from the affluent, aristocratic families of Paris, Madrid and other European cultural centers and brought their haute cuisine, and even their chefs, to New Orleans. A singular French contribution, bouillabaisse from Provence, evolved into gumbo. Spanish paella became the foundation of jambalaya, and the Germans, knowledgeable in all forms of charcuterie, adapted their skills to the making of andouille and other forms of sausage and cured meats. 

Boudin, a sausage stuffed with meat, rice and seasonings, is one of mankinds earliest convenience foods. Served with spicy mustard...sublime!

The Acadians, or Cajuns as they came to be known, originally left France for Nova Scotia, but when the British flag was raised over Canada the French speaking Catholics were exiled from the country and found a new home compatible with their religion in southern Louisiana. Accustomed to roughing it, and having had established good relationships with the Mic-Mac Indians when they were isolated in the woods of Canada, they quickly befriended the native Americans in Louisiana and learned how to forage for the abundant wild game, seafood, vegetation and herbs in the area, and then convert that bounty into “one pot dinners” or etoufees.

Etoufee comes from the French word for “smother”. Here, crawfish is smothered in a tangy tomato sauce and served over rice.

The Indians taught the Cajuns how to use file powder, the ground sassafrass leaf which is a distinctive element of Louisiana cuisine. Enslaved Africans also brought with them the “gumbo” or okra plant from their native soil, which gave name to the soup. And then there’s the muffaletta…Italian, French, African? I got ALL mixed up on that search.

Talk about a melting pot? Small wonder it’s hard to distinguish between Creole and Cajun when you are chowing down on this mélange of flavors that bites, soothes and connects you to the swamps, bayous, lakes, rivers and woods of the Gulf Coast.

I doubt that my extended French family will be able to understand this tune, but nevertheless I share it.  Laissez les bon temps rouler!

Flash Flood!

16 Sep

About 50 miles from Amarillo we saw the rain clouds forming ahead..

When we left Albuquerque, New Mexico this morning I googled the weather forecast for Amarillo, Texas. It looked promising…highs in the 80’s and a 20% chance of thunderstorms, but as we got closer to the city the sky looked pretty ominous.

Before we arrived at the exit for Cadillac Ranch, which we planned to visit, we ran into steady rain and lightning, and decided to drive on to the RV park. Good thing! A few miles later, as we got into the city, the sky grew dark and then just opened up. The rain and hail storm lasted only about 10 minutes, but cars were pulling off to the side of the highway and we could hardly see the road.

Eddie got behind a semi and we buggered on for a mile or so, until suddenly all traffic came to a stop just before we reached an underpass. Uh-oh! An emergency vehicle appeared and set up lights and a crew at the edge of the LAKE that was just in front of us.

After an hour and a half the water level had decreased dramatically.

Once again, I googled weather for Amarillo and they had now issued Flash Flood Warnings for the city and surrounding area. DOH! So, nothing to do but wait until the storm drains caught up and the water level receded. Since it looked like a bit of a wait and it was almost 5:00, it seemed like a good time for a beer, cheese and crackers.

I wish I had taken a video of the storm…it was pretty incredible. I did take this one of our exit, though, an hour and a half later, as we exited the area. It was certainly an adventure, but I am happy to be settled in for the night at a sweet little KOA park, where I am gazing out at a pasture filled with happy, pasture-raised cows…in the great state of Texas.

A Grand Experience

15 Sep

That's a nervous smile on my face and a teasing one on Eddie's!

We arrived in Williams, Arizona around noon today and, according to plan, were able to visit two locations on our “touring agenda”…the Grand Canyon and one of the Route 66 towns that is enjoying a revival. This was my first sight of the Grand Canyon and I took some pictures, but most of the time I walked, gingerly, as close to the edge as I could without feeling nauseous or sweaty palmed. My adoring husband made jokes at my expense (and other visitors’ amusement) by suggesting that I stand on the edge and let him take my picture. “Now, just back up a bit, Sweetie.” Very funny!

We have a long drive ahead of us tomorrow to Albuquerque, New Mexico, so rather than ramble on the blog, I just posted a few pictures of  the majestic Grand Canyon and some signage from Williams in this album.  If you ever get the chance, I would recommend a visit to both of these American landmarks.

Mascot of Twisters Soda Shop in Williams, Arizona

Albuquerque to Amarillo

14 Sep

Enchanted Trails RV Park on Route 66 in Albuquerque, New Mexico

We are, in fact, once again driving Route 66. Our RV park for the night is on the Mother Road at Albuquerque, New Mexico’s Enchanted Trails RV Park. The accomodations are fine and it also has a few classic cars and early travel trailers on exhibit. I wish I had time and opportunity to ask the proprietress to let me take a look inside!

Tomorrow we are leaving early again for a 6 hour drive to Amarillo, Texas, where we will overnight before we head to Dallas/Fort Worth. I would love to see something besides oil fields and tank farms in Texas, so I googled and found the Cadillac Ranch is just off I-40 just outside Amarillo! YAAAY!

I’ve always wanted to see this and can’t believe its on our route. Eddie is a bit indifferent, and even indignant, since he owned a couple of Coupe de Villes back in the day and thinks its a sacrilege that somebody BURIED them in a pasture. Nevertheless, he has agreed to exit the interstate and let me see them. As he just remarked, “I’m just driving Miss Lisa.” He’s a prince!

Hasta pronto!

Ready to Roll

18 Apr

My very first travel blog in 2007 started with this post. We’ve come a long way, Barbie.

I will be sharing images and impressions as we tour the USA.

http://degarrido-rvtrip.blogspot.com/2007/08/barbie-star-traveler.html

Home-Cured Green Olives

7 Sep
Green ripe olives ready for cracking and curing

Green ripe olives ready for cracking and curing

Two years ago I found fresh green olives at the Chico Farmers Market. Curious, I asked the farmer how difficult it would be to home-cure them. He assured me that water curing and brining is simple, if somewhat time-consuming, but well worth the wait. I purchased 10 pounds, prepared them, and the first time we opened a jar of finished olives I wished I had made 20 pounds.

So this year I bought 20 pounds of Barouni olives from Chaffin Family Orchards. They shipped me the box on Tuesday, it arrived on Friday, and on Saturday a friend helped me crack them in preparation for the water-cure.

Olives picked off the tree contain a very bitter compound called oleuropine and they must be “cured” before they are seasoned and brined. There are several methods for curing olives, including water, salt brine and lye solution.

How to Home Cure Olives

Water curing does not change the flavor of the olives as much as other curing methods, so I prefer that technique. Green ripe Barouni olives are large, meaty and are grown specifically for home preparation.

Olives should be cracked, not smashed...just enough to let them leach.

Olives should be cracked, not smashed…just enough to let them leach out the bitter compound.

The first step is to sort and wash the olives, removing any damaged or bruised fruit. Then each olive is “cracked” to expose the pit so that the bitter flavor can be leached out. Next, they are placed in a glass or food-grade plastic container and submerged in water. The water is then drained and replaced daily for a week to 10 days, depending on the level of bitterness you prefer.

After curing, the olives are placed in a “finish brine” of water, salt, vinegar and seasonings. Finally, they are bottled and left to rest for 4 or 5 days and can be kept for up to a year in the refrigerator. The longer they remain refrigerated the more flavor they absorb.

Here is the recipe I use to make Mediterranean Cracked Olives. I’ll update this post when my olives are finished!

Mediterranean Cracked Olive Recipe

Sheet Mulching Lawn #1

26 Jun
We mowed this lawn short and gave it a good, deep soak before we began the sheet mulch progress.

We mowed this lawn short and gave it a good, deep soak before we began the sheet mulch progress.

Our smallest and easiest to convert lawn is in the front of the house beside the driveway. It measures nearly 1000 square feet, has some lovely contours, a river rock face,  and backs up to some mature shrubs and conifers. It is clearly where we should begin, since it will not require any hardscape or permeable paths, other than a little track for the golf cart to go from driveway back to pump house and water tanks. Today we began prepping the site for planting at end of summer by sheet mulching.

Sheet mulching is a layered compost/mulch system that uses cardboard or newspapers as a barrier to help suffocate and decompose the lawn, without having to dig up the sod and haul it away, along with all the beneficial micro organisms that live in the top few inches of the soil. Compost and mulch are then layered on top of the weed barrier, mimicking the build up of leaves and debris on a forest floor. To plant trees, shrubs, perennials and annuals in the new planting medium, you simply cut holes in the mulch and cardboard. We plan to start planting in late August, when temps start to drop. The later the better, actually, and a lot of the mulch and cardboard will probably be decomposed by then,

Recycled cardboard creates a weed barrier and helps compost the lawn, preserving all of the micronutrients in the soil.

Recycled cardboard creates a weed barrier and helps compost the lawn, preserving all of the micro-organisms in the soil.

Nitrogen in mushroom compost helps cardboard break down.

Nitrogen in mushroom compost helps break down the carbon in the cardboard.

Wood chips cover cardboard and mushroom compost, about 5 inches deep in total.

Wood chips cover cardboard and mushroom compost, about 5 inches deep in total.

Sheet mulch ultimately creates a humus-rich soil where bacteria, fungi, and other micro-organisms can thrive and help make nutrients easily available to plants. The thick layer of mulch also discourages weeds and conserves moisture.

By the end of summer this converted lawn space will be composted and ready to plant with California natives and Mediterranean plants. Over the cooler months of fall, winter and spring, the plants will develop root systems that can endure our dry, hot summer weather with minimal irrigation, no maintenance, and no chemical fertilizers or herbicides which might run off into our creek and the aquifer that feeds our well.

And, by the way, even drought-tolerant plants need watering to get established, and a drip irrigation system is the most efficient way to deliver needed water. Fall planting is also advised to take advantage of cooler temperatures and the winter/spring rains.

If you are thinking about the SCVWD landscape rebate program, check out their irrigation hardware rebate offers, as well.